|
I'll be posting some random thoughts here about my photography: my travel plans, technical information behind some images, stories about how certain pictures were captured, etc. The timing of the postings will also be random as my priority is capturing new images rather than writing about existing ones. I hope you will feel free to comment on any of my postings and I appreciate you taking time to read my entries.

"Ko Olina Beach" Wins Photo of the Day!My "Ko Olina Beach" picture won Imaging Resource's "Photo of the Day". CLICK HERE to view Imaging Resource's Photo of the Day page. This image was captured during my trip earlier this year to Oahu. This is the second photograph to win a photo contest from my trip to the island.
This marks the 40th time that one of my photographs was recognized by Imaging Resource as its "Photo of the Day". Click here to view all of the winning entries over the past few years.
Orangutan PortraitLast month, I visited the Tropic World exhibit at the Brookfield Zoo to capture some pictures of the orangutans. Below is a portrait of Sophia, a female orangutan that often poses for me during my visits:
One challenge with zoo photography is controlling the backgrounds. Fortunately, many of the exhibits at the Brookfield Zoo feature backgrounds that more closely match a natural environment. One approach that I use is to wait until an animal enters an area of the exhibit with an acceptable background before taking any pictures. When the distance between the subject and the background increases, it's far easier to create background blur. Background blur places more emphasis on the subject--which is a good thing. Using a wide aperture also helps blur the background. I used my Nikon 300 2.8 VR lens for this image. I opened the lens all the way (f/2.8) to create this look for the background. At f/2.8, the Nikon 300 2.8 lens is an ideal "background eraser"! Another challenge with zoo photography in indoor exhibits is the lighting. I try to use the lowest ISO setting possible to maximize image quality. However, it's also important to select a fast enough shutter speed to create a sharp photograph. For this image, I pushed the limit by selecting an ISO of 500--which resulted in a shutter speed of 1/60th of a second at f/2.8. 1/60th is pushing it. Many photographers don't like to use shutter speeds slower than 1 over the focal length of the lens--which in this case would be 1/300th. By using a slow shutter speed of 1/60th rather than let's say 1/500th, I'm able to use an ISO of 500 rather than an ISO of 4,000. Additionally, by using an aperture of f/2.8 instead of let's say f/4 (which is still fast), I'm able to save another stop of light. At f/4 and 1/500th, my ISO would have been 8,000 (hardly worth bothering to take the picture with my D800). Creating a sharp picture would be nearly impossible at 1/60th with a 300mm lens without incorporating further tools. Of course, a tripod is essential. Having my camera locked down on a solid tripod allows me to shoot at lower shutter speeds for maximum image quality. I also used a Nikon SB-900 flash unit. That short burst of light helps freeze any movement at this lower shutter speed. CLICK HERE if you wish to view more images from my photo shoot. Backlighting at Polynesian Cultural CenterDuring my recent trip to Hawaii, I enjoyed capturing photographs at the Polynesian Cultural Center (PCC). The PCC is very photographer friendly. They permitted me to carry all kinds of gear--including my massive 500mm lens. They also allowed me to shoot from a tripod at all locations, including the various shows. The only event that was off limits was the "Ha: Breath of Life" live performance evening show. My only problem while shooting at the PCC was the sun! I visited the Center on three separate days, and each day the sky was clear. There wasn't a cloud in the sky. This might sound ideal for the ordinary visitor. But, this direct sun is a photographer's nightmare. The lighting is very harsh. Shadows go black and highlights get blown out. It's particularly unappealing when taking pictures of people--and people were my primary subjects at that location. During my first visit, I selected a location where I could capture pictures of the Canoe Pageant with a clean background. However, the sunlight was so harsh and the shadows so dark that most of my pictures weren't worth the time to process them. I returned for a second time in hope of some cloud cover. Earlier that day, the sky was cloudy and the light was soft and diffused. But about 15 minutes before the Canoe Pageant started (it starts at 2:30 PM every day), the clouds cleared and the sun once again made the light impossible to manage. My approach was to only take photographs during the brief time that a canoe entered some shade cover. This severely limited my photo opportunities. Following is one of the images that was captured in this unappealing light:
On my third visit, I used a very different approach. This is an approach that most portrait photographers would probably have thought of to begin with! My approach was to set up in a location where I was shooting directly into the sun. That way, the light would be even on the faces and people wouldn't be squinting while looking toward the bright light. This approach worked well for me. Here are a couple of examples of how I used backlighting to create more appealing images in the same conditions that the above picture was taken:
This solution worked for me. I only wish I had thought of it sooner. Great Western Loop Road TripThis summer's trip covers a wide loop around the western portion of the United States. The journey takes more than a month and over 7,500 miles to complete. Here's my itinerary with some of the photo shoots: 1- Minneapolis, MN - Mall of America 2- Minneapolis, MN - MN State Capitol, Como Park Zoo 3- Bismarck, ND - ND State Capitol 4- Billings, MT 5- Helena, MT - MT State Capitol, Cathedral of St. Helens 6- Kalispell, MT - Garnet Ghost Town, St Francis Xavier Church 7- Kalispell, MT - Triple D Game Ranch 8- Kalispell, MT - Triple D Game Ranch 9- Spokane, WA - Manito Park. Gonzaga University 10- Colfax, WA - Steptoe Butte 11- Colfax, WA - Palouse 12- Crater Lake, OR - Discovery Point 13- Crater Lake, OR 14- Redding, CA - Sundial Bridge 15- Fresno, CA - Crocker Art Museum, St John's Cathedral (exterior) 16- Los Angeles, CA - the Broad, Petersen Automobile Museum, Getty Center 17- Los Angeles, CA - Disney Concert Hall, Los Angeles Central Library, Union Station 18- Oceanside, CA - Mission, Oceanside Pier 19- San Diego, CA - Scripps Pier 20- San Diego, CA - La Jolla Cove 21- Las Vegas, NV - Ruvo Brain Center 22- Las Vegas, NV - City Center, Arts District 23- Las Vegas, NV - Neon Museum, Stratosphere 24- Tucson, AZ - Mission San Zavier del Bac 25- Tucson, AZ - Saguaro National Park, Barrio Viejo 26- Tucson, AZ - University of Arizona, Sonora Desert Museum 27- El Paso, TX - Mission Trail, Scenic Drive Overlook 27- El Paso, TX - Mission Trail 29- Amarillo, TX - commute day 30- Wichita, KS - Keeper of the Plains, downtown Wichita 31- Keokuk, IA 32- Orland Park, IL
Brushing in Some SharpnessLast month, I attended the Out of Chicago Winter Conference. During this photography conference, a few hours were set aside for the conference participants to shoot various subjects. Several photographers congregated around many of the flowers that were on display. One of the photography decisions to make when shooting these orchids is to select an aperture. Like many of the photographers, I wanted a narrow depth of field. It's a challenge selecting an aperture in which the front orchid is in sharp focus while the other flowers drop out of focus. If I went with a wide aperture, the front flower wasn't in focus enough for my liking. But if I narrowed the aperture, the background became too sharp. Here's how I solved this problem. I used two apertures! I used the extremely narrow aperture of f/20 to ensure that the front orchid is entirely in focus. Then, I used a nearly wide open aperture (f/4.2) to allow the background to drop out of focus and become less distracting. This approach involved taking two exposures--one at each aperture:
Then, I layered these two frames in Photoshop:
Note that the f/4.2 layer is my base and that the f/20 exposure is placed on a layer above that. From there, I painted in the f/20 sharpness (white reveals, black conceals) on the mask to the right of the f/20 layer. The end result is that the front orchid is sharp at f/20 while the remainder of the image is soft at f/4.2. In my mind, I ended up with the best of both worlds! Here's the final photograph:
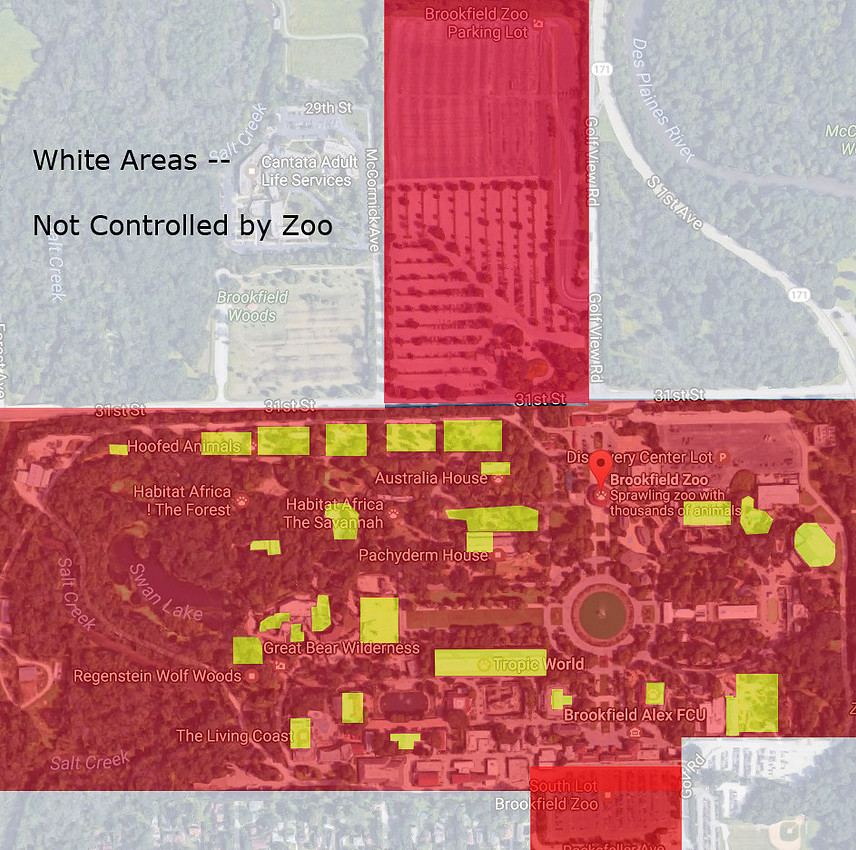
Captivity Galore...Over the years, I have visited the Brookfield Zoo (as well as many other zoos from around the country) countless times. For the most part, the Brookfield Zoo has been a paradise for photographers. Interesting subjects are relatively close by. And, the Brookfield Zoo generally uses moats (rather than more obstructive glass, cages, fencing) to separate visitors from the animals. In recent years, I feel that the zoo experience has diminished. Perhaps it's that I'm gaining a greater appreciation of the price that's being paid by a wild animal being held in captivity. Most animals yearn to be free. And, animals that know nothing other than captivity (that's even sadder) eventually lose their purpose for being--they no longer practice the productive skills that they utilize in the wild. Zoos serve a purpose. Zoos are critical for educating people on the necessity of preserving our wild places and our wild animals. But, when I see a majestic lion or bear pacing endlessly in a small loop (as I did today)--I feel sorry for the animal that is paying the price for our education. Also during my visit today, I was saddened to see a giant anteater pacing in a tight circle for nearly 15 consecutive minutes. I feel even sadder for the animal after I've witnessed how much this contrasts with how they behave in the wild. But, let's make the assumption (a valid one) that zoos play an important role in educating the public and in promoting conservation. Even so, I would like to see our zoos allocate more space to the animals and a bit less to the people. Earlier this week, I visited the Brookfield Zoo--and noticed that many of the recent renovations are all about the people and very little about the animals. For example, the biggest money right now is being spent on expanding the entrance road and stations into the zoo. Other recent initiatives that are evident are the restroom renovations and event spaces. As I walk around the Zoo, I notice many exhibits that have been closed for quite some time--or have transitioned into something else (not allocated to animals). For example, the old bear exhibits have sat empty for many years. A while back, the Zoo covered these empty exhibits with colorful plywood. The baboon island has been empty for years--and will eventually be replaced with something else I suppose. The jellyfish exhibit disappeared in favor of a peacock statue after thousands of jellyfish died there. The Pachyderm House sits half empty--and there hasn't been an elephant housed in that exhibit for years. The old Reptile House has been converted into administrative offices. So, as you look at the map of the Brookfield Zoo, you'll notice that most of it is RED...those are areas devoted to people activities: parking lots, a carousel (really?), restrooms, parks, restaurants, concession stands, an event area, playgrounds, fountains, etc. The area where the captive animals are free to roam are colored in YELLOW. WHITE represents areas within box that are not controlled by the Zoo. So, what percentage of this area is allocated to the animals? Maybe 5-10% of this already relatively small area in the western suburbs of Chicago? How much of the Zoo's property is dedicated to parking? Maybe 20%? I think we can do better than this.
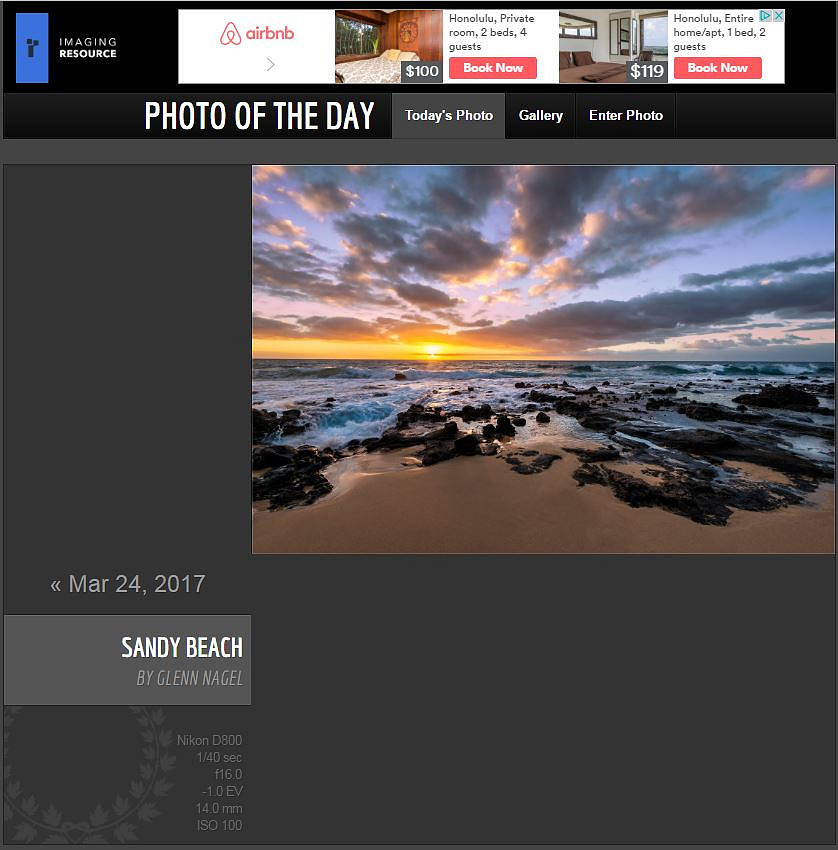
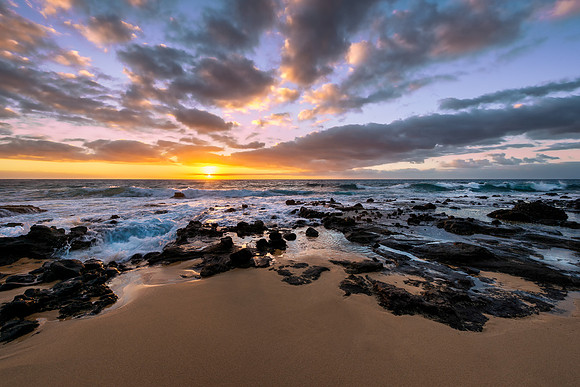
"Sandy Beach Sunrise" Wins Photo of the Day!This morning, my "Sandy Beach Sunrise" picture won Imaging Resource's "Photo of the Day". CLICK HERE to view Imaging Resource's Photo of the Day page. This image was captured during my trip earlier this year to Oahu. This photograph was captured early in my trip and was the first beach that I visited on the island during my two week stay.
This marks the 39th time that one of my photographs was recognized by Imaging Resource as its "Photo of the Day". Click here to view all of the winning entries over the past few years.
Unexpected Hawaiian ExperiencesI recently visited the island of Oahu in Hawaii. In my last blog entry, I wrote about several instances of when I experienced the Aloha Spirit. This was not a typical photography trip for me. I almost always take road trips. It's been years since I boarded a plane. And, this was my first time in Hawaii. Hawaii was not always what I expected. In many ways, it exceeded my expectations. At times, it fell short of being a paradise for me. Following are some random thoughts about things that surprised me:
Aloha!I knew, of course, that Hawaii is the "Aloha State". But, until I experienced Hawaii, I didn't fully understand what that meant. Following are some examples of situations in which I encountered the Aloha spirit during my short stay on the island:
In my next post, I'll share some of the unusual things that I experienced while on Oahu--some good, some not so good and some very trivial.
North Shore SurfingWhile in Hawaii, I planned to photograph surfers on the North Shore of Oahu. During my stay, there were three surfing competitions scheduled--two at the Banzai Pipeline and one at Sunset Beach. Unfortunately, things didn't work out as I hoped. I arrived at the Banzai Pipeline just after sunrise to view the competition. Not knowing anything about surfing, I was pleased to see that the waves were very high. However, as time passed, I was surprised that nobody was in the water. I asked the lifeguard when the competitive event was going to start. He explained that it was cancelled due to "disorganized" waves. Apparently, the choppiness of the sea made it impossible to surf that day. The next day, I tried my luck at Sunset Beach. I was pleased to see surfers in the ocean. I was there quite early, so the event organizers were still setting up. One of the announcers for the event told me that the surfers at Sunset Beach were going to be "way out there" and that it would require a large telephoto lens to photograph the event. I thought I came prepared with my Nikon 500mm f/4 lens--but that wasn't nearly enough! So, I attached the Nikon 1.4x teleconverter--which gave me an effective focal length of 700mm. And, that really wasn't enough! I couldn't even see the surfers with my naked eye. If nothing else, the magnification of the 700mm lens permitted me to better view the action. And the action was thrilling. Fortunately, my Nikon D800 has a high resolution sensor. This allows me to crop the frame somewhat without losing too much image quality. Also, the waves were so massive that I decided to frame the entire wave rather than trying to isolate the surfer. This permitted me to retain more of the original file--which also improved the image quality. I utilized a few tried and true long lens techniques to create sharp images with such a long focal length. First, I secured the lens to a stable tripod. Next, I rested my left hand on top of the lens to help minimize any vibration. Then, I selected a fast shutter speed. When I view the high resolution version of the image below, I can read the print on the surfboard:
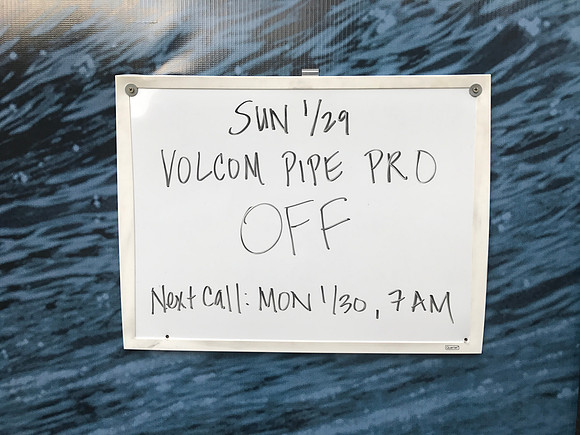
The event's announcer told me that I would have better luck the next day at the Banzai Pipeline. He said that the action was much closer to the beach. So, I once again arrived at the Pipeline at sunrise the next morning. The weather seemed suitable to me, but once again I know nothing about the sport. I didn't see anyone at the beach. After wandering around for a few minutes, I came upon this sign:
And with that, my surfing photography came to an end. I was leaving for the airport later that day. Of the three events that I attended, only one took place--and that was the one with the surfers positioned far out into the sea. To view more of my surfing photographs from Oahu, please CLICK HERE. |