|
I'll be posting some random thoughts here about my photography: my travel plans, technical information behind some images, stories about how certain pictures were captured, etc. The timing of the postings will also be random as my priority is capturing new images rather than writing about existing ones. I hope you will feel free to comment on any of my postings and I appreciate you taking time to read my entries.

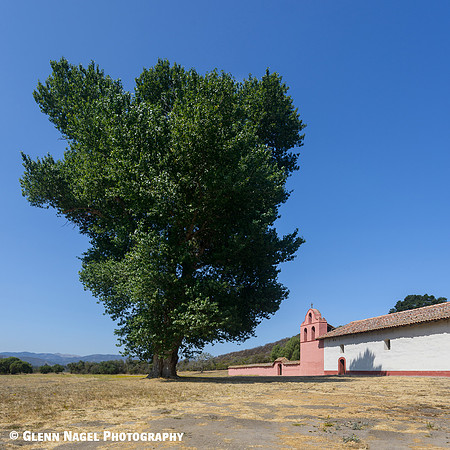
Telling a Tall TaleI think a photograph is more interesting when it portrays a subject in a different way. During my recent photo shoot at La Parisima Mission in Lopoc, California, I applied some techniques to hopefully add a new dimension to a scene. As I approached the church, I couldn't help but notice the large tree in front of the building. My goal was to create a photograph that featured the tree as the main subject with the church as a background object to give scale to the tree's massive size. The tree is big, but not nearly as big as it appears in the picture. I used the following techniques to exaggerate the size of the tree:
In my opinion, the picture gives the impression that the tree is massive (almost redwood-like). It appears as if it would take out the entire church if it were to fall on the building!
"Bonsai Rock" Wins Photo of the Day!This morning, my "Bonsai Rock" picture won Imaging Resource's "Photo of the Day". CLICK HERE to view Imaging Resource's Photo of the Day page. This image was captured at Lake Tahoe during my recent road trip from Chicago to California and back. My first challenge in creating this picture was finding this location! The road runs well above the shoreline, so the rock is not easy to spot. The other challenge was parking. People were parked along the highway for at least a mile in each direction of this area. As night approached, the parking opened up. Once I parked, I had second thoughts about making the very steep decent from the road to the lake. With the help of a hiking pole, I finally made it. I used an extremely long exposure to capture this image. The shutter was open for 14 minutes! I also practiced some newly learned processing techniques. Those techniques include new methods for dodging and burning, using luminosity masks to control the light more precisely and color channels to tweak the colors. Additionally, new sharpening and noise reduction methods were applied to this image. I'm relieved that the picture met this test!
This marks the 33rd time that one of my photographs was recognized by Imaging Resource as its "Photo of the Day". Click here to view all of the winning entries over the past three years.
24 HoursThere's no question that traveling can be a lot of fun. But, it can also be exhausting! I recently returned from a long road trip. I left Chicago to drove to California in mid-July and returned 32 days later. Most days started with an early morning photo shoot, some midday scouting of possible locations and an evening shoot. I also had to work the 7,000 miles of driving into that time period! I would like to dedicate this blog entry to outline the 24 hour period which started on the first day of my trip. This day is fairly typical of a photography day for me on the road. 1:00 PM: Arrived in Iowa City from my morning drive from Chicago. Visited the Old Capitol Building. Walked the campus of the University of Iowa and captured images of the Pappajohn Business Building. Drove to Des Moines.
Checked into the hotel in Des Moines. Walked a mile along the Des Moines River to scout locations for cityscape photos. Lighting was not the best, so I used a long exposure to add some interest to the sky for the following image. Then walked a couple of more miles to view the Iowa Women of Achievement Bridge to prepare for my evening photo shoot.
After dinner, I returned to the bridge. I captured a number of images before sunset and kept shooting through the "blue hour". The following picture was taken at 9:30 PM.
Time to upload the files to my laptop. Captions were added to each image in Lightroom. GPS coordinates were added as well. Files were backed up on two external hard drives. All batteries recharged. Midnight: Time to go to bed and hopefully get some sleep! 5:00 AM: Left hotel to arrive at the University Avenue bridge for a dawn cityscape. Fortunately, University Avenue is just ten minutes away. Got set up on the bridge and kept shooting from 15 minutes before until 30 minutes after sunrise. Sunrise is 5:54 AM.
Return to the hotel for a shower and breakfast. Check out of hotel. 8:00 AM: Arrive at the Des Moines Art Center before the lighting gets too harsh. I enjoyed the site, so I kept shooting for about an hour.
Drive to the Iowa State Capitol. The lighting is no longer ideal for outdoor shooting, but I intend to shoot interiors now. I stay at the Capitol for over an hour.
Drive to the Salisbury House. I scouted this location earlier this morning when I was over at the Art Center. My intention is to tour the site. I captured a few photos as well.
I enter my car in the parking lot of the Salisbury House. It's time to move onto the next city and Day #2 of this 32 day journey. It can be an exhausting process. During this 24 hour period, I logged 10 miles of walking (according to my Fitbit), slept for just 5 hours, drove a few hundred miles, and captured numerous images (more than 30 keepers). Cleaning UpI captured this basic photograph of the exterior of the Carmel Mission during my last road trip:
Although this picture appears to be a straightforward simple shot, I thought I would share what was involved in creating it. The Carmel Mission was very crowded. The parking lot was full and people were parked up to four blocks away from the mission. Hundreds of people were wandering the grounds. To capture this image without tourists, I waited for a long time before the scene finally cleared (for the most part):
I waited until the other section of the frame opened up and shot the next couple of images:
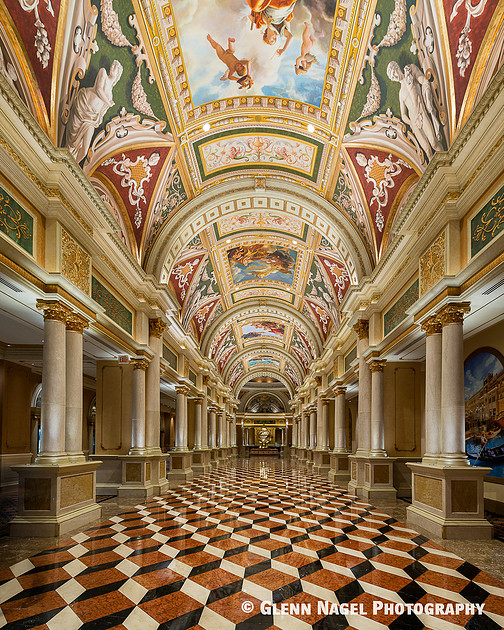
The next thing that bothered me was the open door of the basilica. To close the door, I used the Mirror Trick. The mirror trick is something that I use often to clean up photographs. To read more about it, click here for one of my past blog entries on the subject. I didn't have the luxury of shooting this scene in the best light. Sometimes with travel photography, I have to take what I can get. I decided to convert the image to black & white using Nik's Silver Efex Pro software. It's not the greatest image in the world, but I think the adjustments (removing people, closing the door and converting to B&W) helped make the photography more presentable. Blending Galore!During my recent road trip to photograph the California Missions, I used blending techniques to handle a lot of situations. For years, I've created high dynamic range (HDR) photographs which use multiple exposures to handle a wide range of lighting within the frame. Now, I've expanded my blending techniques: Blending Methods: #1: High Dynamic Range: This is the one I use most often. It helps to address wide ranges of light within a scene to better control exposing for both the shadows and the highlights. #2: Focus Points: Sometimes subjects are positioned both very close and very far from the lens. It's makes it almost impossible to have everything in the frame in tack sharp focus even when selecting a narrow aperture setting. Narrow aperture settings also diminish image quality due to diffraction and reveal any sensor spots that might exist. So, I'll select my f/8 aperture for optimal lens performance and make multiple exposures--with various segments of the frame in focus for each exposure. Later, I blend them in Photoshop. #3: Polarization: Using a circular polarizer can help bring out the colors in a scene by removing glare. Typically, skies go dark blue and the white clouds pop as well. While shooting in the mountains of California, applying a polarizer usually makes the sky look unnatural--the sky gets way too dark. Yet, I wanted the full effect of the polarizer on the foreground (i.e., foliage, rusty cars at the Bodie Ghost Town, etc.). So, I captured two exposures--one polarized for the foreground and one without the filter for the sky. Then, the two get blended in Photoshop for the best of both worlds. #4: People Eraser: While shooting the interior of several Las Vegas hotels, I wanted to capture the scenes without people in the frame. This is nearly impossible given how crowded these locations get. By waiting for a relatively slow time, and capturing several exposures in which people are positioned in different portions of the frames, I'm able to eliminate everyone during processing by stacking the pictures into layers and using masks to select the appropriate portion of each exposure for the final image. This method was a savior throughout my last photography trip! #5: Exposure Times: I've been experimenting with long exposure photography. I like the effect that very long exposures can have on moving water and clouds. However, sometimes I want the water to blur but to freeze the clouds. So, I'll take two exposures and blend them later to isolate the long exposure effect to just one portion of the frame. #6: Moments in Time: Lately, I've been locking my camera down on a tripod for extended periods of time--such as an hour or two. That way, I can capture various points of time for later blending. For example, while I was in San Diego I captured a picture of the skyline a twilight. But, the windows of the buildings weren't lit brightly until the sky went completely black about 45 minutes later. So, I captured that as well. Later, I can blend in the office lights with the twilight shot to effectively turn the lights on! This approach came in handy in other situations as well--such as capturing exposures of a landscape from just before sunset (for foreground detail) in addition to a "blue hour" sky for later blending. While shooting the fountains of Bellagio, I blended water positions from various segments of two different water shows into one frame! After a while, I started combining the various blending approaches. For example, I might shoot exposures to account for expanded focus (#2) as well as selective polarization (#3). Or, I might expand the dynamic range by using HDR (#1) while removing people from the scene (#4). The possibilities are endless. Having these tools available helps me revolve many of the challenges that I face in the field. I will expand upon each of these blending approaches in future blog entries. But, here's an example of an image where I combined HDR with the People Eraser. The Grand Entrance of the Venetian Hotel is a busy place, but you wouldn't know it by viewing this image:
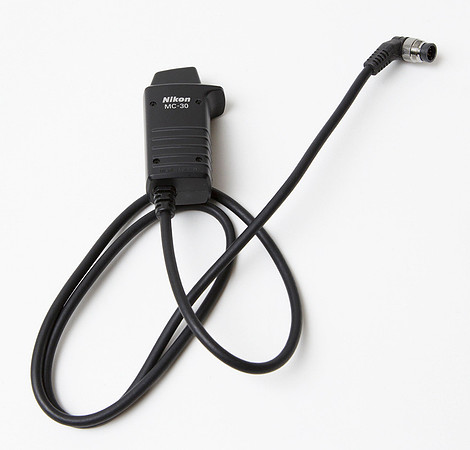
Cable Release WoesI almost always use a cable release while shooting. This allows me to capture pictures without touching the camera--therefore minimizing the risk of introducing camera shake. Of course, there are other ways to minimize that risk, such as activating a shutter and exposure delay. But, there is no substitute for the cable release when it comes to very long exposures--more than 30 seconds. Once the shutter speed exceeds 30 seconds, it can't be selected in camera. Rather, the shutter speed must then be set to Bulb and triggered by pressing the shutter and holding it down until the exposure ends. The cable release allows you to press the shutter without touching the camera...then lock the shutter down through the mechanism on the release. Years ago, I got burned when my cable release malfunctioned during a trip. I was quite far from the nearest city with a camera store--Moab, Utah. I headed right to the camera store when I arrived in Moab to buy the cable release. The sign on the door indicated that they were closed for the season and would reopen four months later in April! A man from a nearby general repair store said that he could perhaps try to repair the cable. The issue was that the labor would far exceed the $5 that I paid for that third party release! Since then, I bought the genuine Nikon MC-30 cable release. It's more durable.
My Nikon MC-30 served me well for nearly three years. But, three weeks into my trip it failed! Fortunately, I had the foresight to bring a backup. Unfortunately, the backup was dead right out of the box! Once again, I was without a cable release. And, I had some long exposure photo shoots on my itinerary. The next day, I visited Samy's Camera store in Santa Barbara. They had a suitable cable release. It was a third party brand and they charged me $35--seven times what I would pay for a comparable one on eBay. I asked the sales person if he thought the release would hold up for the next two weeks until I got home. He said it it certainly should. Naturally, I treated this third cable release with kid gloves. I was careful to never stress the cord. When activating the shutter, I made sure to press it down softly. With one day left on the trip, the cable stopped working! Now that I'm home, I ordered another Nikon MC-30. Actually, it's a new and improved model...the MC-30A. Let's hope it lasts as long as my MC-30 did! Step Aside!Last week, I posted a blog entry about how moving over to view a scene from a different perspective can help bring more depth to a photograph. I used this approach quite often as I took pictures on interior spaces throughout my road trip from Chicago to California and back. Just over two years ago, I visited the Colorado State Capitol. I created the following picture of the Grand Staircase:
While planning my road trip, I mapped it out such that I would go through Denver. When I last visited the Capitol over two years ago, I wasn't able to photograph the chambers as they were under renovation. This time, I planned to capture pictures of both chambers to add to my collection. As I approached the chambers, I was stunned to see scaffolding and tarps--both chambers were still closed! They will reopen sometime next year. However, I took the opportunity to try to improve upon my previous photographs of the building by trying different perspective and lenses. Once again, the fisheye lens got a workout as well. I'm glad I made the stop in Denver. Besides the Capitol, there were several interesting sites within walking distance--including two cathedrals, City Hall, the Art Museum and some awesome downtown architecture. I came away with a lot of images during my morning in Denver. Move Over for Depth!I enjoy capturing symmetry in my images. Upon entering an interior space, my first instinct is to place my tripod in the center of the scene to ensure that everything in the frame is as balanced as possible. During my most recent road trip, I found that I still do this. However, in addition to that standard perspective, I've made a conscious effort to seek out other vantage points--particularly those from the corner of a room. Here's an example from Day #1 of my trip. I photographed the Grand Staircase before in the Iowa Capitol back in 2013. This is the image from from three years ago:
I returned to this location last month. Since I had already captured the above image, I was determined to try something new. Here's what I came up with this time:
So far, I've only processed photographs from the first day of my 32 day road trip from Chicago to California and back. As I go along, there are many more examples of this approach to capturing interiors in a variety of ways. Colorful StairsThe Museum of Science and Industry in Chicago has four staircases. Each one is a different color: green, yellow, red and blue. The stairs are named is a simple manner: Green Stairs, Yellow Stairs, Red Stairs and Blue Stairs. I always enjoy taking pictures of staircases, so I captured some photographs of these stairs during one of my visits to the museum. There were some challenges. The museum is crowded so it takes some patience to wait until the scene clears. Glass panels are placed above the railings to prevent the many young visitors from climbing over the railings. Without setting up a ladder, it's impossible to avoid shooting through the glass. The reflections in the glass present more challenges. Finally, the museum frowns upon tripods. I was only able to get a couple of exposures using a tripod before security asked me to put the tripod away. Without the tripod, I was forced to boost my ISO (compromising image quality). Removing the tripod from the equation also prevents me from creating high dynamic range (HDR) images. The museum has a policy which prohibits the use of tripods. However, when I became a member of the museum, I was told that the tripod policy is very loosely enforced. I was encouraged to give it a try and to stop using it only after being confronted by security. So, that's what I've done. I usually get in about a half hour of shooting with the tripod before having to put it away. My approach is to start photographing exhibits that are away from the main hall (less security presence) and then gradually work my way towards the center of the building. Here are a few pictures of the staircases:
Call Ahead...When traveling great distances, it can be frustrating to arrive at locations that are closed. It's equally frustrating to enter a venue that isn't lit. So, during my last two photography trips I started calling ahead before visiting certain buildings. The risk with calling ahead is that the request to photograph a location might be declined; whereas I can almost always get a few good shots before being asked to leave certain places! But, if permission is granted in advance, I can take all the time I need to get better pictures. Whenever possible, it's always better to get permission. During my road trip to South Dakota, I called a number of places to ask permission to do some photography. Representatives from three of those locations returned my call and ultimately allowed me to photograph the interior of the buildings. I didn't receive any response from three other locations. The first place I visited was the Orpheum Theatre in Sioux City, Iowa. I'm glad I called in advance. My request to photograph the interior of this beautiful theater (which opened in 1927) was promptly granted. The theater was closed on the morning of my visit, so if I hadn't called in advance I wouldn't have been able to enter the building. Instead, the representative from the theater was there right on time (9am on a Monday) to open the door for me. Not only was I granted access, but the theater was then lit for me and I was able to direct when the drapes were to be open or closed depending on what I was shooting. My visit lasted more than two hours and was one of the highlights of my trip. Please CLICK HERE to view images from my visit.
My next location was the St. Joseph Cathedral in Sioux Falls, South Dakota. The cathedral is open for visitors, so I would have been able to enter without advance permission. But, it wasn't lit. Fortunately, I made arrangements weeks in advance to meet a church representative at 3:00 pm on a Monday--and he adjusted the lighting to my satisfaction. If the interior of the church isn't lit, it's not worth photographing. With the lights on, it's a stunning subject! CLICK HERE to view more images of the Cathedral.
The third location that I called well in advance was the Basilica of St. Mary in Minneapolis, Minnesota. Please CLICK HERE to view the photos from that visit. I was told that I could photograph the interior, but that the church would be open to other visitors. So, the recommendation was to visit early in the morning while the church would be relatively empty. So, I entered the church at 6:30 AM on a Monday. An order was placed to have the church lit for photography just before my photo session. I was welcomed into this church and had an enjoyable visit.
I think there are few things that helped me gain this level of cooperation. First, I called well in advance. Then, I offered to provide the original digital images to the church/theater free of charge. They are free to use these images for anything they wish (i.e., website, programs). I also send a link to my website and pictures from other similar venues. In some cases, my portfolio was reviewed before the request was granted. While I was visiting one of the venues, the representative told me that she had heard of me and was familiar with my work. I replied that there must be another photographer out there with the same name then! One of the churches declined my initial request on the grounds that commercial photography isn't permitted. I asked if it would help if I promised not to sell the pictures. My request was then granted. Two of the three venues have requested the digital files from me and plan to use them in publications. They were very appreciative--just as I was. Everyone wins when these requests are handled properly! |